Using Content in Your B2B Funnel
In 2022, the importance of content in B2B marketing is well-understood. According to HubSpot’s 2021 edition of their annual marketing report, over 80% of B2B marketers actively use content marketing in their strategy.
Understanding that content works isn’t typically the big challenge for B2B marketers. The challenging part is creating the right content and serving it to prospects at the right stage in their customer journey. Many well-meaning marketers have been unsuccessful with their content marketing efforts simply because they failed to calibrate their efforts towards the right audience properly.
In this article, we’ll talk more about the importance of aligning content with your customer journey and some general tips on getting started.
Understanding User Intent Throughout the Funnel
The best thing you can do to make content successful is to make it helpful. And before you can create useful content, you have to know what kind of help site visitors are trying to find. There’s a massive difference between what might help someone who is still trying to pinpoint their exact needs and what might help someone ready to buy and shopping around for the best price.
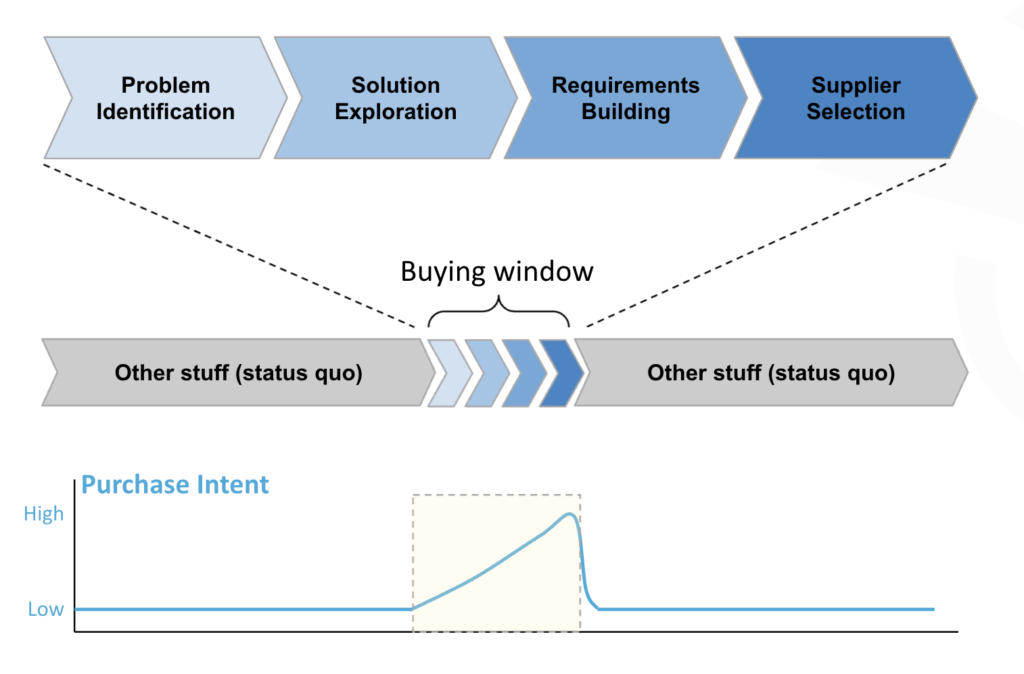
Typically, B2B marketing content can be divided into three categories: top of the funnel, middle of the funnel, and bottom of the funnel.
Prospects at the top of the funnel may not even be aware they have an issue. They may or may not be actively shopping for a solution to some kind of challenge in their workplace. Sharing knowledge and education is key here – a hard sell will turn off prospects at the top of the funnel since they may not even be ready to start shopping for the kind of solution you offer.
In the middle of the funnel, people are aware of an issue and are researching potential remedies but may not have settled on one particular solution. They’ve learned a bit about their challenge but still need more information. However, they are ready to start absorbing information about a solution they might purchase – whether that’s a piece of software, a service, or another type of product that fits their needs. Content still shouldn’t be overly sales-y, but it can start to point users toward a product or service that can help. One example of helpful mid-funnel content is comparing different solutions to explain features and differences.
At the bottom of the funnel, prospects are well-educated and have a strong understanding of the problems they are facing. They might even have some experience making a similar kind of purchase in the past. In this stage, the most significant concerns are regarding price and logistics – how much will they be paying, and how will the payments work? How will the installation of the product or software work? If your content can ease these logistical concerns, it will be valuable to those reading it. This kind of content is typically highly targeted to fit buyers’ needs at this stage of the journey.
What Kind of Content Should You Create?
Another more sophisticated question marketers ask about their content marketing campaigns is the ideal content they should create. There are a few classic examples in today’s B2B content marketing era:
- Blog posts you’d regularly publish on your company website. These typically cover a handful of topics that people at the company know best, often tied into the business offering.
- Explainer videos you publish on YouTube or a company’s website or blog. These are great for helping to break down advanced concepts into more digestible pieces.
- Infographics combine text and graphic education in a slick visual package. They’re great for social media and are easily shareable. These factors make them great for when buyers need to send information to others within their company or share to their own feeds.
These are just a few common kinds of content. Others include podcasts, interviews, emails, and white papers. What kind is ideal for your business? There’s no right or wrong answer. The best way to find out is to create a few different types and run experiments to see which ones resonate the best with your audience. Speaking of experiments…
Support Iteration of Content Plans with Data
It’s easy to plan your content in a vacuum and make assumptions about what will work best. This is especially true of seasoned veterans of a specific industry who have spent years or even decades addressing customers’ needs. However, this strategy is often a recipe for content that doesn’t resonate with your target audience.
It may take longer, but changing one variable per experiment is the only way to truly zero in on your best type of content. Share on XA much better way to approach planning, creating, and distributing your marketing content is through testing and experimentation. If you’re starting from scratch, create three or four types of content covering different topics and see which one performs best.
Remember, the key here is to change one variable at a time to understand which factors drive results. It may take longer, but changing one variable per experiment is the only way to truly zero in on your best type of content.
Always Optimize for Value
At the end of the day, B2B marketing comes down to the amount of value you can provide for the people consuming your content and may be interested in your offer. This isn’t always the same as B2C marketing, where you can use techniques that play to people’s emotions and human desires. B2B content marketing needs to have a sharp focus on helping people achieve their professional goals.
But to do that, you must first understand those goals. In other words: if you want to master content, you first need to become a master of your target audience’s desires. Meeting these desires is the overarching goal of everything you do: every piece of content, social media post created, and email sent out to your list should be with the intent of adding value and helping your audience overcome challenges.
It’s not enough to simply produce content and push it out, hoping it will work with the desired effects. You must take the time to study the results, think about what they mean, and then work on adjusting your content plan based on your interpretation of that data. Increasing your pace of production might help, but it might also lead to a lot of spinning wheels and wasted effort by your content team.
Instead of blindly reaching around to hit what works for your audience, take a more calculated B2B content marketing approach. Match your content to user intent based on where they are in the funnel, take time to understand what they want from content and pay close attention to your analytics. Use that data to determine which kinds of content you should expand on and which kinds you may want to scrap.
If you need help with conversion rate optimization (CRO) or any other part of your B2B funnel, fill out this quick form to see how we can best help you optimize your marketing.